
At the end of 2019 we were ready to begin work on our second iteration of the Viruscraft project, moving focus from how viruses jump from one species to another, to how they evolve once they are in a population. This project has been focused from the start on designing and building physical interfaces to help understand invisible biological interactions between viruses, host organisms and evolution. Our new plans included a virus installation with different kinds of switches on the outside to invite people to manually "mutate" spike protein shapes directly. This blog post focuses on the process we followed and discoveries made - we will follow this up with more information about the game shortly.
One of the interesting aspects of working with virus researchers during this time has been getting an expert's view on the pandemic, and as COVID-19 spread we quickly found ourselves adapting and changing our plans with Dr. Ben Ashby's feedback. In the world we were entering, spike proteins, R numbers and transmission had gone from niche jargon that needed explaining to every-day usage. Suddenly doing things like inviting people to "touch a virus" was hardly appropriate. We now started to rethink the project along the following lines:
- Retain a physical presence while not needing people to touch anything
- Use movement and simple shapes to indicate mutation, a virus adapting to its world
- Keep to our proven use of familiar materials and appropriate technology (see also the Penelope Project)
- Employ the history of wooden automata to provide a kind of familiarity
- Try and avoid too many medical associations with what we were building
A further limitation was doing this research under lockdown conditions that involved turning our shed into a solar powered manufacturing base while dealing with sudden shortages of components and materials due to disrupted supply lines and infrastructure.
Touch free sensors
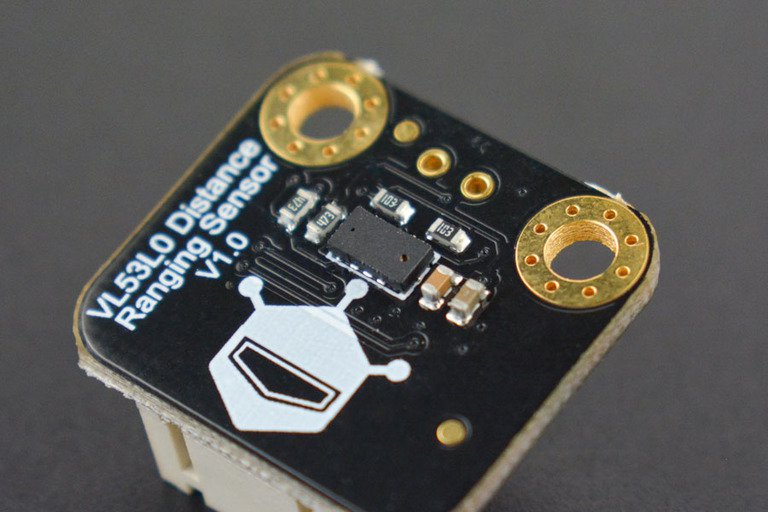
We began looking at touch free sensors we could use to detect gestures - initially with standard infra red proximity sensors to trigger our servo movement (to the lower left of the photo below). These are extremely cheap and easy to get hold of, as they are standard for uses from parking warning systems to automatic taps. The issue that these sensor have is that due to 'historical oversight' they only work well on pale skin, so we hunted around for better alternatives.
The one we picked was a VL53L0X ToF Distance Sensor which uses a Lidar (laser) which fixes this problem: "VL53L0X provides accurate distance measurement whatever the target reflection unlike traditional technology". We're currently using it like a button - setting the range to trigger under 100mm but as it detects up to 2m, we could eventually use it for more expressive gestures in future.
One of the big decisions we made with the second version of viruscraft was that instead of playing the role of the virus, you are playing as host organisms. Your job is to mutate the receptors that the virus use to latch on to infect your creatures to reduce your susceptibility to it. The virus now evolves to adapt to the population you are controlling, and the game is about staying one step ahead of the virus evolution.
We use four sensor boxes you hold your hand over to select which receptor shape your host species will grow with in the next generation (there is a new generation every couple of seconds). The sensors themselves are contained within the lid of the box (see technical plans below) and each box contains an Arduino nano that reads the sensor data and passes it to the Raspberry Pi along with an LED that lights up a frosted acrylic indicator window when the sensor is activated.
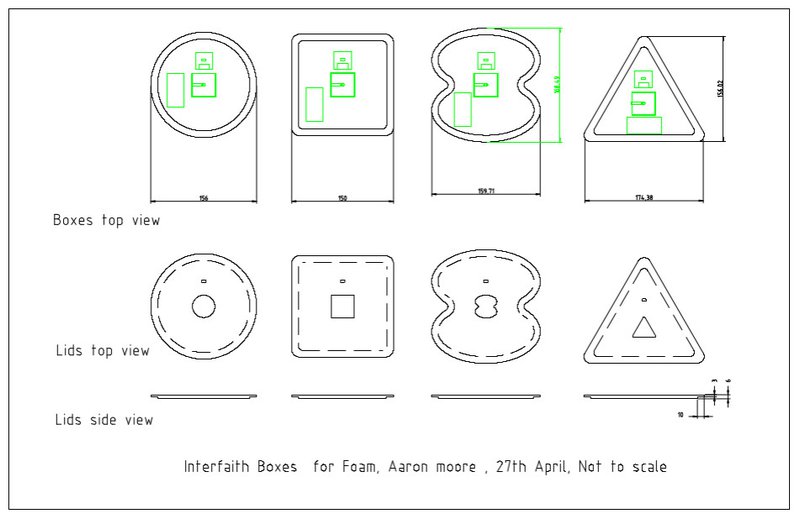
As this needs to be able to be used in long running exhibitions, one of the issues we were worried about was how to protect the sensors from dust while not blocking the laser beam. We started with clear acrylic milled to fit precisely in a small hole in the lid. During testing it seemed that this would work if the laser sensor is right up against, and touching acrylic - but in practice it turns out the internal reflections are too much and this causes interference. We had to re-machine the lids to allow us to glue the sensor circuit boards into place so that the laser/sensor component itself is flush with the top of the lid.
Robot prototype 1: Balsa lego
Parallel to working on the sensors we started a long research and prototyping project for how to create moving indicators for the virus spike proteins. Inspired by the MIT press-fit construction kit we decided to use a similar approach to prototyping something we weren't quite sure what the end result was going to look like. By combining a simple set of standardised components with standard 6mm dowel we could leave our tiny solar powered CNC machine continuously churning out parts throughout the day while we worked on building our first prototype. Using just two servos we could select between four shapes that would represent the spike protein for one face of our virus.
All the exact measurements could be tweaked by trimming the dowel or changing the connectors between them. One of the things we were most satisfied by with this version was fastening the dowel bearings with little C rings milled from an old credit card. Being able to combine materials with the same equipment to fulfil different tasks is useful when you don't have much to work with.
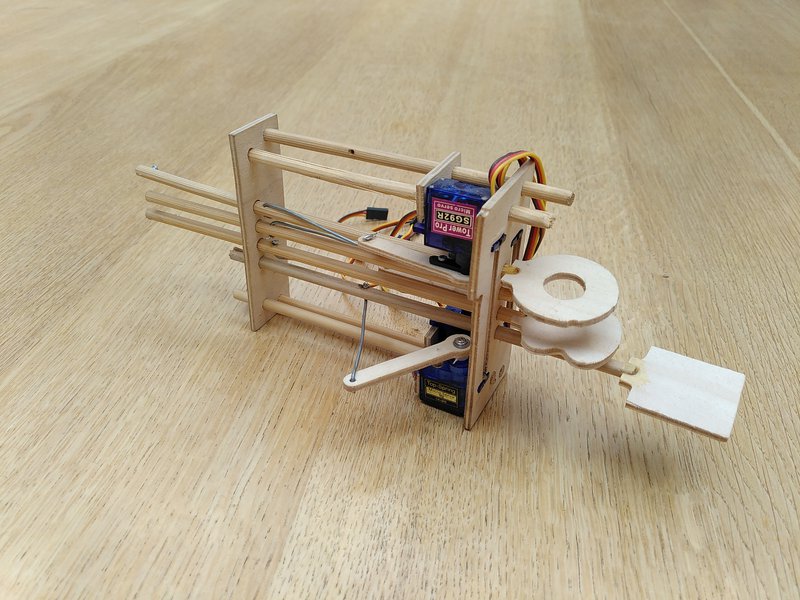
Robot prototype 2: Miniaturisation
As you can see from the video above, the mechanism is pretty big. Far too big to combine together into a 20 faced icosahedron that our virus capsid is formed from. We decided to try using four servos to move each shape individually instead of two that were doubled up. This meant it would be a little more expensive, but we could save space by removing the long opposing levers. At this stage (and throughout the rest of the design/build process) we kept the use of dowel but used more custom parts rather than the Lego approach in the first prototype.
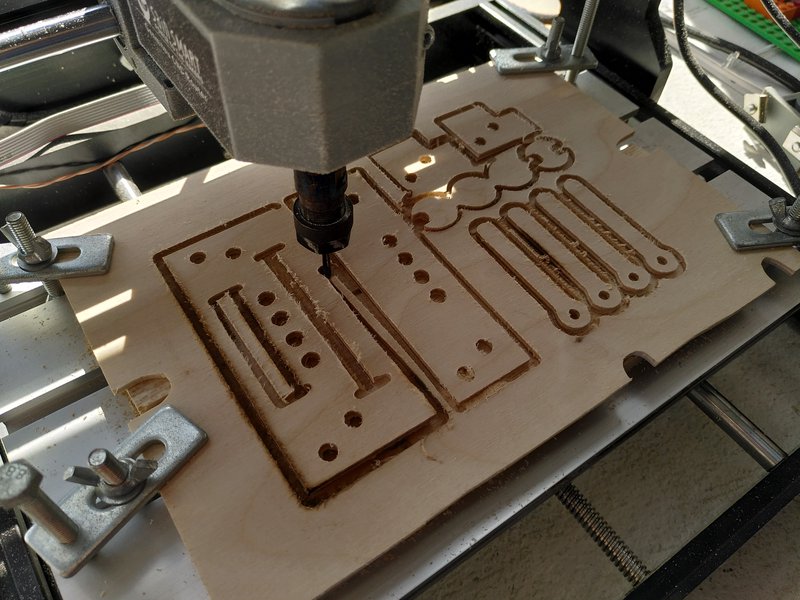
In terms of workflow for this project, we were using OpenSCAD to do the 3D design, Inkscape to prepare SVGs and JSCut to create gcode for the CNC mill. Now we were back in our studio and thanks to a Cultivator grant we had upgraded our CNC machine (we could now very easily cut plywood rather than being restricted to balsa) which made everything easier.
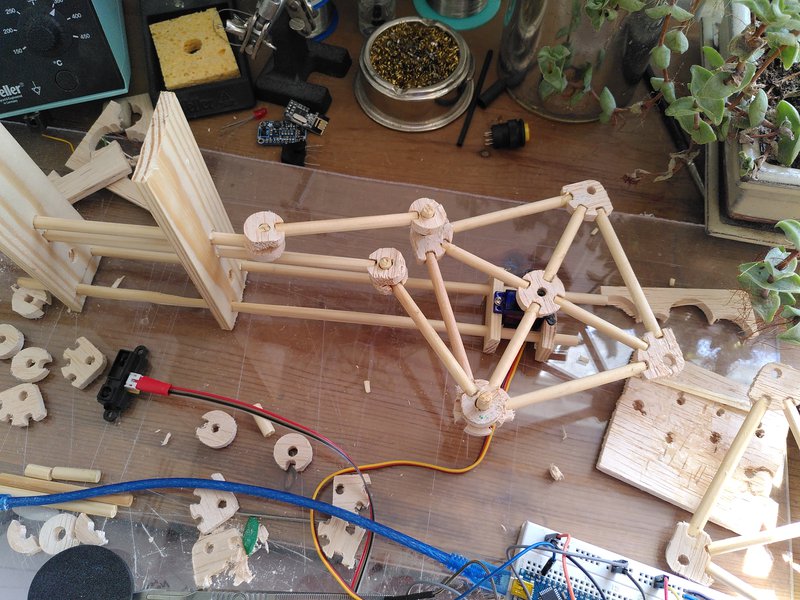
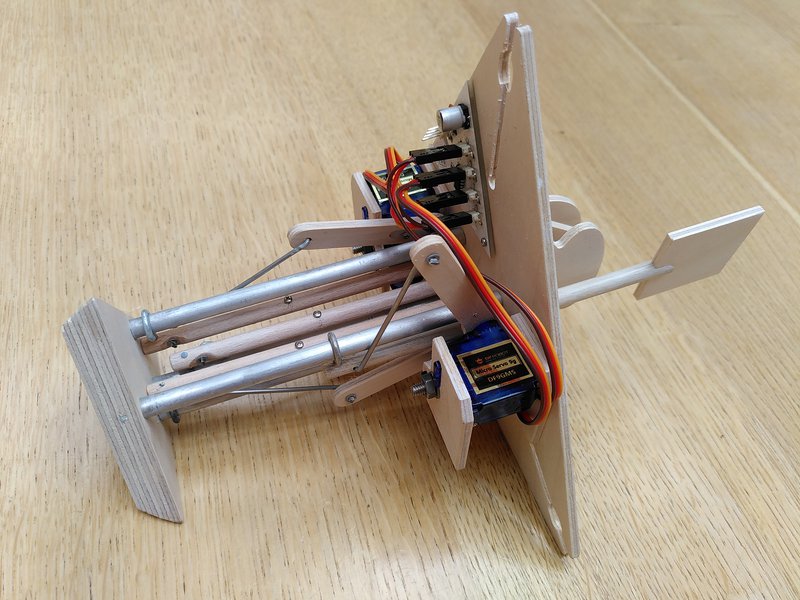
Robot prototype 3: Sliders and triangles
The mechanism above is still quite simple in that the rods that push the shapes are held in place by the frame. This means they need to stick out the back of the mechanism for almost as far as they move forward. By making it slightly more complex, and adding four more static rods for the the moving ones to slide against, we could remove the need for this, and hopefully make something that would not jam.
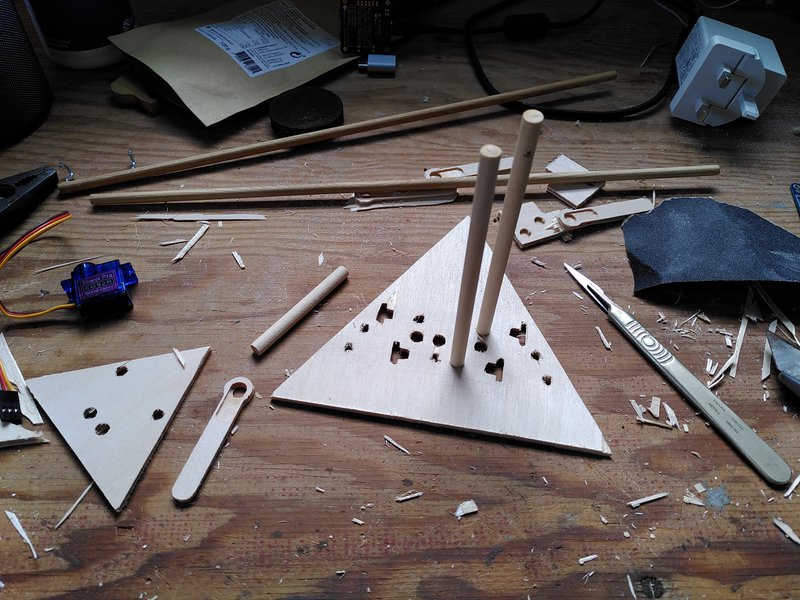
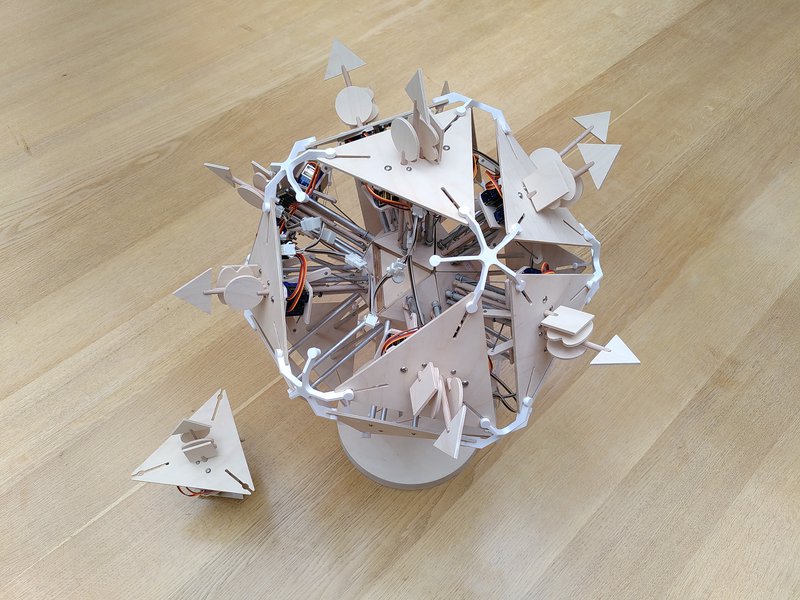
We also needed to think about how this would all connect together into the icosahedron, which meant switching to using triangles as the main supports. Our plan was that they would clip together on the outside of the shape and use magnets to lock the inner triangle to a small central icosahedron "core" shape.
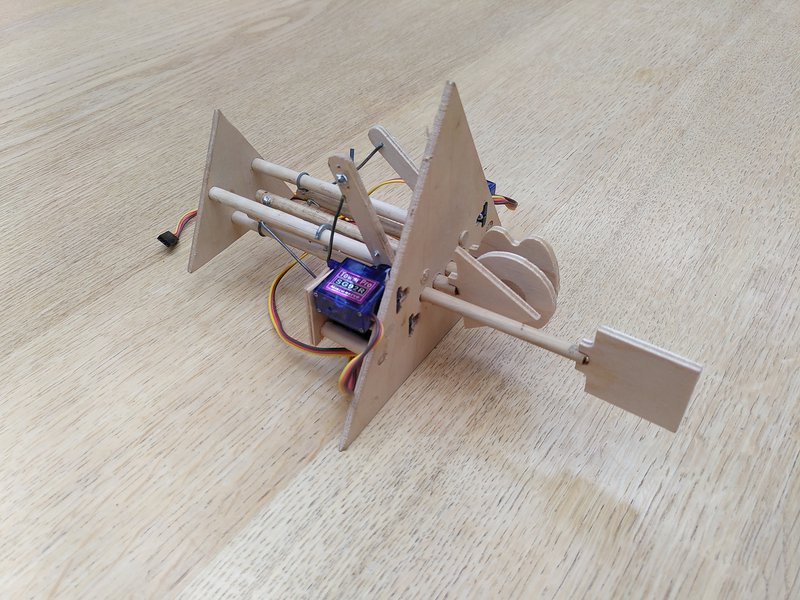
This finally got the mechanism to the size that was needed to make a virus that wouldn't be too large and extended the spike protein shapes far enough to be easily visible. The next step was to work with our good friend and spotter and fixer of all the tiny details we've completely missed, Aaron Moore, to make this into something we could manufacture at scale.
Final production

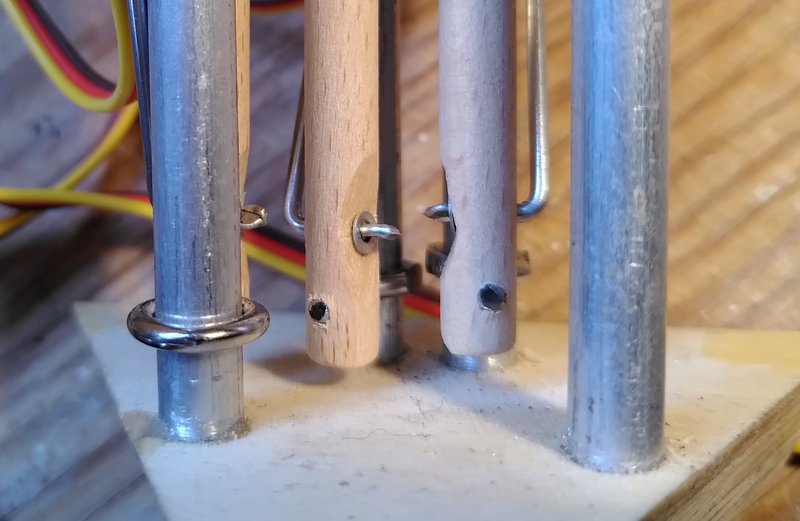
It's funny looking back at what were critical issues at the stage of going from building one to thirteen mechanisms - there was a long search for metal eye hooks that were large and thin enough to slide over the static rods, but not hit each other as they were passing. In the end Aaron used some standard picture hanging hooks he ground flat in a few places. Then there was how to keep the wire connectors from the servo arms in the wooden dowels without them catching against each other. No space for nuts or bolts, on the third prototype I used blobs of solder, but the new connecting wires were non-ferrous and solder (not an ideal approach in the first place) would not flow onto them. Aaron made a special crimper from a hacked pair of pliers to hold some tiny washers in place.
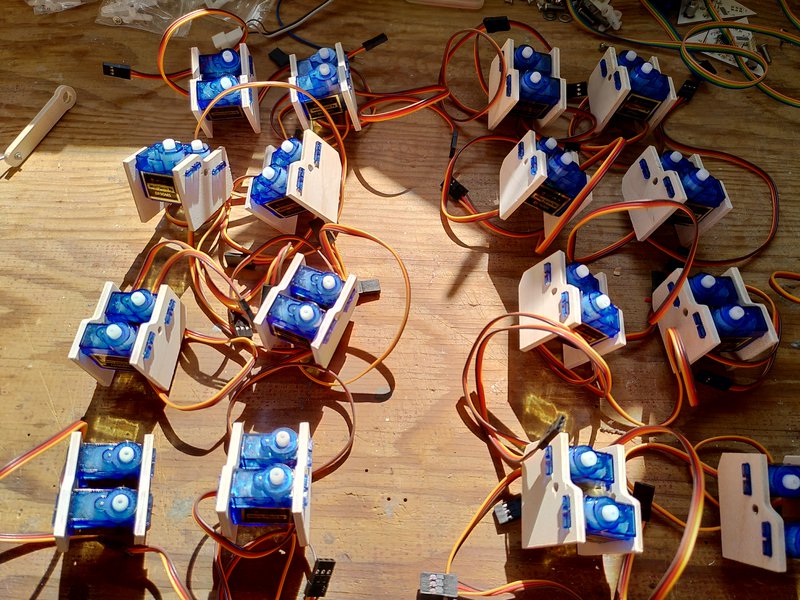
Now we could move on to mass production. This was happening during the second lockdown and with global shortages of components, supply lines in trouble (ships jammed in the Suez canal etc) we were lucky not to depend on many components we couldn't manufacture ourselves or get very easily. The only complex parts we weren't making were the servos - forty go in to each virus, and we suddenly couldn't get hold of the ones we originally tested with. We switched to lower specification servos after testing them for six hours doing continuous movement in the mechanism (another use for a solar powered shed!). Mainly they have smaller rotation angle, meaning a bit more of a tricky calibration stage, but they were at least possible to get hold of in the quantities we needed.
The final virus capsid assembly is designed to be modular with each triangle easily replaceable - we made spares to add in redundancy. It also results in a structure that is surprisingly light and strong. The 3D printed corner connectors were originally used for another design by Aaron Moore, lamp shades inspired by one of the first Viruscraft workshops, so it was really satisfying to put them to use here.
We will be posting more a lot more videos and information about viruscraft soon. Currently everything is ready to go, and we are waiting for conditions to improve in order to do some kind of initial event - this will give us some valuable feedback, both on how the virus works for to understanding how variants evolve, and also on how people's attitudes to these issues have changed over the past 18 months.